Here is how I mounted my front hitch on my 2004 Winnebago Winnie 31C on a Ford E-450 chassis.
I purchased my hitch from etrailer.com, they had the best price that I could find.
The instructions that came with the hitch did not say that you had to remove the front bumper. However, there are only 4 bolts that hold the bumper on, so I just removed the bumper for the installation.
Here are the tools you will need:
13/16 deep socket
3/4 socket
ratchet
drill
9/16 drill bit
Diagonal cutters (wire cutter)
Helper (I drafted my Son for this)
It took us about 1 1/2 hours to complete this project in my driveway.
Lets get started.....
Camper before we began
You will need to remove plastic shroud under the bumper. Use the diagonal cutters to carefully pull out the plastic pin and then the plastic rivet. There are 2 of these, one on each side. The shroud will be easily removed after removing the 2 plastic rivets.
This is the outside bumper bolt on the passenger side. It takes the 13/16 deep well socket. Only remove the large nut, the small nuts stay in place.
Here is the inside bumper bolt on the passenger side. It is a tight fit with the horns right beside it. You can put a hand through the opening in the grill to help with this.
This is the outside bumper bolt of the drivers side. Again, only remove the large nut.
This is the inside bumper bolt on the drivers side.
This is an easy bolt to reach. Warning, I left one nut on slightly, on each side until I could get my son out of the house to help remove the bumper. He was studying for his college finals. Got to have my priorities... Ha Ha Ha... Just joking....
We removed the bumper and set it off to the side. The bumper is not to heavy.
The 2 hitch mounting holes on the passenger side. We will be using the oblong hole in the back and the smaller hole (inside the frame) in the front of the picture to mount the hitch.
The mounting holes on the drivers side.
You don't have to do anything to install the back mounting bolts. Use the carriage bolt and the plate that comes with the hitch. Looking the the side holes, I have no ideal how you would get these items inside the frame without removing the bumper. I know some people have done it, but I would rather remove the bumper.
This is the passenger side.
This is the drivers side. The hitch instructions show the metal plates are suppose to be mounted across the frame. However, they are to long to do this.
I could not resist to test fit the hitch, looks pretty good to me.... You have to slide the hitch towards the rear in order to get the front holes to align.
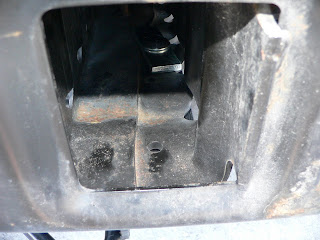
This is the front mounting hole on the passenger side. You have to enlarge this hole. I used a 9/16 drill bit, it worked for me.
The same hole on the drivers side. You also have enlarge this hole.
Here are the 2 bolts and plates installed on the drivers side. I forgot to take pictures of the enlarged holes and the passenger side. Forgive me.... :)
The hitch is installed!!!!!!!
We reinstalled the bumper. This is the inside passenger nut. It is still difficult to reach but can be done.
Warning: Tighten both outside nuts first, then check and make sure the bumper is level. There are some adjustments to level out the bumper.
Here is the inside bolt on the drivers side.

This is what it looks like under the bumper. You do not have to cut any of the plastic to install this hitch.

Draw-Tite Front Mount Trailer Hitch #65001
Sorry for such a long post. However, I do better when I can see pictures when I do projects.


1 comment:
Nice post. Just bought one of these front mount hitches so your pictures really help. Thanks.
Post a Comment